
Okay, so listen up! If you’re anything like me, you love a good dessert but sometimes, just sometimes, turning on the oven feels like *too* much work. Especially when it’s warm out! That’s where this incredible No-Bake Apple Cake swoops in to save the day. Seriously, it’s a game-changer.
I stumbled upon the idea for this cake one lazy afternoon. I had a bunch of apples that were looking a little sad, and zero motivation to bake a traditional pie. I remembered seeing those layered cookie cakes and thought, “Hey, why not apples?” And let me tell you, it was a stroke of genius!
This isn’t some fussy, complicated thing. We’re talking simple ingredients, minimal fuss, and maximum deliciousness. Trust me, even if you think you can’t bake, you can totally nail this No-Bake Apple Cake. It’s become my go-to for last-minute get-togethers and when I just need a little sweet pick-me-up without breaking a sweat.

Why You’ll Love This No-Bake Apple Cake
Seriously, what’s not to love? This cake is practically magic! It’s:
- **RIDICULOUSLY EASY:** No fancy skills needed, promise!
- **QUICK to Assemble:** You’ll have it layered up in no time.
- **Packed with Flavor:** Those warm apples and creamy layers? Divine!
- **Effortless:** No oven? Yes, please! Perfect for hot days or when you’re feeling lazy.
It’s just the perfect, simple dessert.
Simple Steps for a Perfect No-Bake Apple Cake
Okay, here’s the best part: you don’t even need to preheat the oven! The hardest part is cooking down the apples, and even that is super simple. You’re basically just layering goodness into a dish and letting the fridge do the rest of the work. Easy peasy!
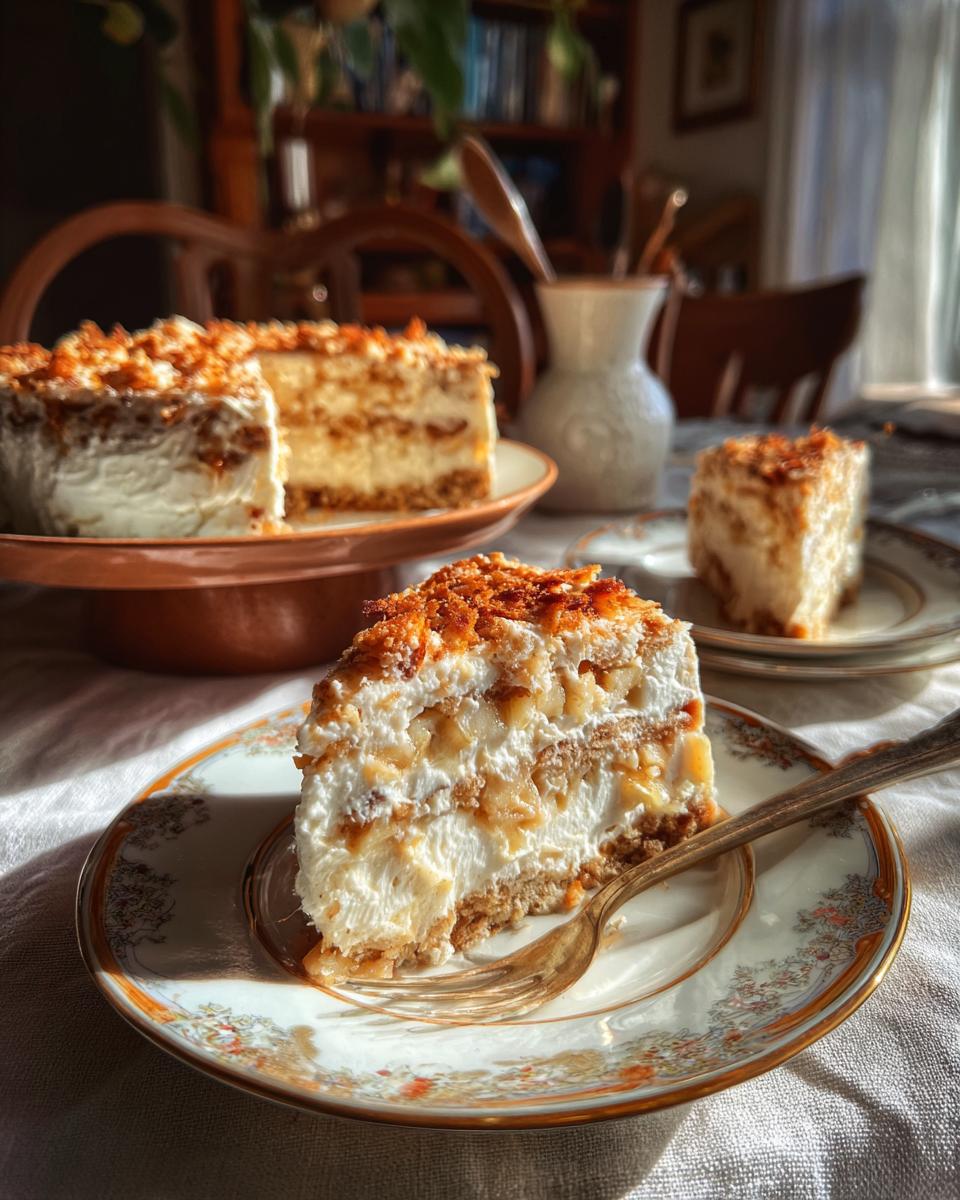
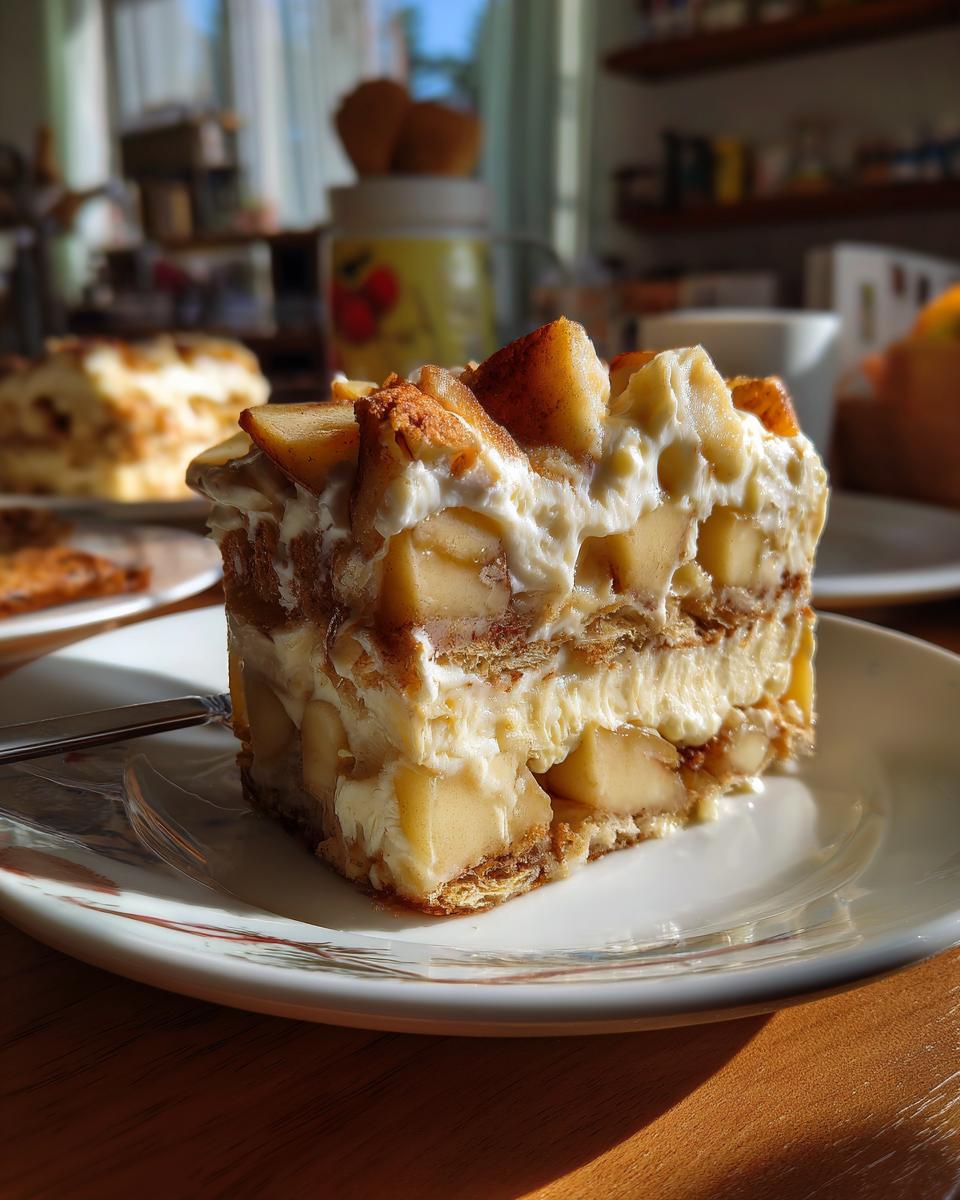
Delicious Layers of a No-Bake Apple Cake
Get ready for texture heaven! You’ve got those soft, spiced apples mingling with smooth, creamy goodness, all nestled between delicate ladyfingers. Each bite is a little bit of everything, a perfect mix of sweet, creamy, and just a hint of spice. It’s seriously addictive!
Gathering Ingredients for Your No-Bake Apple Cake
Alright, let’s talk ingredients! The beauty of this No-Bake Apple Cake is that you probably have most of this stuff hanging out in your pantry and fridge already. No need for a special trip to a fancy store! We’re keeping it simple and delicious. You’ll need some fresh apples, of course – make sure they’re peeled, cored, and sliced nice and thin so they cook down easily. Then we’ll grab some sugar and warm spices like cinnamon and cloves for that classic apple pie vibe. A little bit of water helps everything simmer together nicely.
For the creamy part, you’ll need cream cheese, make sure it’s softened so it beats up smooth! Powdered sugar adds sweetness without being grainy, and a splash of vanilla is a must for that cozy flavor. And finally, some heavy whipping cream, whipped up until it’s light and fluffy, is folded in to make everything dreamy. Oh, and don’t forget the star of the show – ladyfingers! You’ll need a few packages of those delicate cookies to build our layers. That’s it! See? Simple!
Crafting Your No-Bake Apple Cake: Step-by-Step Guide
Alright, deep breaths! This is where the magic *really* happens, and I promise it’s super chill. We’re going to take those lovely ingredients and turn them into a showstopper of a No-Bake Apple Cake with just a few simple steps. No need for fancy gadgets or complicated techniques. Just follow along, and you’ll have a seriously delicious dessert ready to chill.
Think of it like building edible LEGOs! First, we make our two main components – the lovely spiced apples and the dreamy creamy filling. Then, we stack them up with our ladyfingers. Easy peasy, right? The key here is just giving each step a little bit of love and letting the fridge do the heavy lifting at the end. Let’s get started!
Here are the steps, written out just like I do it in my own kitchen:
- Get those apples prepped! Peel ’em, core ’em, and slice ’em up.
- Pop the sliced apples into a big saucepan with the sugar, cinnamon, cloves, and water.
- Cook that over medium heat. Stir it around every now and then until the apples are nice and tender, usually about 15-20 minutes.
- Let the apple mixture cool completely. This is important!
- While the apples cool, grab a big bowl and beat the softened cream cheese and powdered sugar together until it’s super smooth.
- Stir in the vanilla extract.
- Gently fold in the whipped cream. Be careful not to deflate it!
- Now, grab your 9×13 inch baking dish. Line the bottom with a single layer of ladyfingers. You might need to break a few to fit.
- Spread half of that glorious cream cheese mixture over the ladyfingers.
- Spread half of the cooled apple mixture over the cream cheese layer.
- Repeat! Another layer of ladyfingers, the rest of the cream cheese, and the rest of the apples.
- Cover the dish (plastic wrap works great) and pop it in the fridge. It needs at least 4 hours to chill, but overnight is even better!
See? Totally doable! Now, let’s break down those key parts just a tiny bit more.
Preparing the Apple Filling for the No-Bake Apple Cake
This is where we get that amazing, warm, spiced apple flavor! Just toss your prepped apples into a saucepan with the sugar and those lovely spices – cinnamon and cloves are a match made in heaven with apples. Add a little water to help things along, and cook it over medium heat until the apples are soft and tender. Stir it often so nothing sticks! The most important thing here is to let this mixture cool down *completely* before you add it to your layers. We don’t want to melt our creamy goodness!
Creating the Creamy Layer for the No-Bake Apple Cake
Okay, for the creamy part, make sure your cream cheese is nice and soft first! That makes it so much easier to beat smooth with the powdered sugar. Get it really well combined, no lumps allowed! Then, stir in that vanilla. The final step is folding in your whipped cream. Be gentle here! We whipped that cream to make it light and airy, so we want to keep it that way. Just fold it in until it’s all incorporated and looks like a cloud of deliciousness.
Assembling the Layers of the No-Bake Apple Cake
This is the fun part – building your cake! Grab your dish and lay down a single layer of ladyfingers. Don’t be afraid to break them to fit, it’s all going to be covered up anyway! Then, spread half of that creamy mixture over the cookies. Next, spoon half of your cooled apple filling on top of the cream. Repeat those layers! Ladyfingers, then the rest of the cream, and finally the rest of the apples. Make sure everything is spread out nicely. Cover it up and patience, my friend! The chilling time is essential for everything to set and for those flavors to meld.
Tips for No-Bake Apple Cake Success
Alright, you’re almost there! Just a few little things to keep in mind to make sure your No-Bake Apple Cake is absolutely perfect. These aren’t complicated, just little nudges to help you along. First off, that chilling time? Don’t skip it! Seriously, that’s how everything sets up and those flavors really get to know each other. At least 4 hours is a must, but if you can manage overnight, even better!
Also, like I mentioned before, make sure your cream cheese is nice and soft. It makes a world of difference in getting that smooth, lump-free creamy layer. And when you’re folding in the whipped cream, be gentle! We want to keep that airy texture. Room temperature ingredients for the cream cheese mixture are key for easy mixing. Just these little things will make sure your No-Bake Apple Cake turns out beautifully every single time!
Frequently Asked Questions About This No-Bake Apple Cake
Okay, I know you might have a few questions buzzing around in your head about this easy dessert, and that’s totally fine! Let’s tackle some of the common ones I get about this No-Bake Apple Cake.
Q: Can I use different fruits instead of apples?
Absolutely! This ladyfinger cake is super adaptable. Peaches, pears, or even berries would be delicious. Just cook them down like you do the apples until they’re tender.
Q: Do I *have* to use ladyfingers?
Ladyfingers work best because they soak up the moisture beautifully and soften into a cake-like texture. You could try other thin, crisp cookies, but the texture might be a little different.
Q: How long does this No-Bake Apple Cake last in the fridge?
It’ll last covered in the fridge for about 3-4 days. Honestly, it gets even better after a day or two as the flavors really meld!
Q: Can I freeze this cake?
While you *can* freeze it, the texture of the cream cheese layer and the ladyfingers might change a bit when thawed. It’s really best enjoyed fresh after chilling.
Q: Is this truly an easy dessert for beginners?
Yes, yes, a thousand times yes! If you can stir and spread, you can make this No-Bake Apple Cake. It’s designed to be simple and forgiving.
Variations to Your No-Bake Apple Cake
Okay, so while this No-Bake Apple Cake is *perfect* as is (in my humble opinion!), sometimes it’s fun to play around and make it your own, right? This recipe is super forgiving and loves a little creativity! Like I mentioned, you can totally swap out the apples for other fruits. Peaches are divine, and a mixed berry version in the summer? Yes, please! Just cook them down the same way.
Want to add some crunch? Sprinkle some chopped nuts – pecans or walnuts are great – between the layers. Or, for a serious treat, drizzle some caramel sauce over those apple layers before you add the next round of ladyfingers. Oh my goodness, talk about a flavor bomb! Don’t be afraid to experiment and find your favorite twist on this easy dessert!
Serving Your Delicious No-Bake Apple Cake
Okay, the moment has arrived! Your beautiful No-Bake Apple Cake is perfectly chilled and ready to be devoured. To serve, just slice into generous pieces – it holds its shape surprisingly well after it’s had a good chill! You can serve it just as it is, which is totally delicious. But if you want to be a little extra (and who doesn’t sometimes?), a dollop of extra whipped cream or a sprinkle of cinnamon on top is lovely. A tiny drizzle of caramel sauce wouldn’t hurt either, just saying! Enjoy every single bite!
Storing and Reheating Your No-Bake Apple Cake
Got leftovers? Lucky you! This No-Bake Apple Cake stores beautifully. Just make sure it’s covered tightly with plastic wrap or in an airtight container and pop it back in the fridge. It’ll stay delicious for about 3-4 days, and honestly, the flavors just get better over time! Since it’s a no-bake situation, it’s really meant to be enjoyed cold, so no need to think about reheating. Just grab a fork and dig in straight from the fridge!
Estimated Nutritional Information
Okay, so while we’re focusing on deliciousness here, I know some of you like to keep an eye on the nutritional side of things. Just a heads-up, this is an *estimate* for this No-Bake Apple Cake, and it can totally vary depending on the specific brands and ingredients you use. Think of it as a general idea, not a strict rule!
- Serving Size: 1 slice
- Calories: Around 450
- Sugar: About 40g
- Sodium: Roughly 150mg
- Fat: Approximately 25g
- Saturated Fat: Around 15g
- Unsaturated Fat: About 8g
- Trans Fat: 0g (yay!)
- Carbohydrates: Roughly 50g
- Fiber: About 3g
- Protein: Around 5g
- Cholesterol: Approximately 80mg
Again, this is just an estimate, so please don’t stress over the exact numbers. The most important thing is enjoying a delicious slice of homemade goodness!
Share Your No-Bake Apple Cake Experience
Alright, you’ve made it! Now it’s your turn. I’d absolutely LOVE to hear how your No-Bake Apple Cake turned out! Did you try a variation? What did your family think? Leave a comment below and share your experience!
Print
Shockingly Easy No-Bake Apple Cake in 2 Parts
- Total Time: 4 hours 50 minutes
- Yield: 12 servings 1x
- Diet: Vegetarian
Description
Easy no-bake apple cake with layers of cookies and cream.
Ingredients
- 2 lbs apples
- 1/2 cup sugar
- 1 tsp cinnamon
- 1/4 tsp ground cloves
- 1/4 cup water
- 2 (8 ounce) packages cream cheese, softened
- 1 cup confectioners’ sugar
- 1 tsp vanilla extract
- 1 1/2 cups heavy whipping cream, whipped
- 3 (7 ounce) packages ladyfingers
Instructions
- Peel, core, and slice apples.
- In a large saucepan, combine apples, sugar, cinnamon, cloves, and water.
- Cook over medium heat until apples are tender, about 15-20 minutes. Let cool.
- In a large bowl, beat cream cheese and confectioners’ sugar until smooth.
- Stir in vanilla extract.
- Fold in whipped cream.
- Line a 9×13 inch baking dish with a layer of ladyfingers.
- Spread half of the cream cheese mixture over the ladyfingers.
- Spread half of the cooled apple mixture over the cream cheese.
- Repeat layers.
- Chill for at least 4 hours before serving.
Notes
- You can use other fruits like peaches or pears.
- Add nuts or caramel for extra flavor.
- Prep Time: 30 minutes
- Cook Time: 20 minutes
- Category: Dessert
- Method: No-Bake
- Cuisine: American
Nutrition
- Serving Size: 1 slice
- Calories: 450
- Sugar: 40g
- Sodium: 150mg
- Fat: 25g
- Saturated Fat: 15g
- Unsaturated Fat: 8g
- Trans Fat: 0g
- Carbohydrates: 50g
- Fiber: 3g
- Protein: 5g
- Cholesterol: 80mg
Keywords: apple cake, no-bake cake, ladyfinger cake, cream cheese cake, easy dessert