
There’s just something magical about pulling a warm loaf of French bread from the oven, isn’t there? That first crackle as you slice into the impossibly crisp crust, giving way to a soft, airy interior… honestly, it’s a moment of pure bliss! For years, I thought making classic French bread at home was some kind of culinary superpower reserved for professional bakers. I mean, how could I ever replicate that perfect texture, that irresistible aroma?
Then, one rainy afternoon, I finally decided to try it. And wow, was it a game-changer! The satisfaction of creating something so utterly delicious, right in my own kitchen, was incredible. Trust me, once you’ve tasted homemade French bread, those store-bought loaves just won’t cut it anymore. This recipe isn’t just about baking; it’s about experiencing the simple joy of transforming humble ingredients into something truly extraordinary.

Why You’ll Love This French Bread Recipe
Okay, so why *this* French bread recipe? Because it’s not just good, it’s *unbelievably* good. We’re talking bakery-quality loaves right in your own kitchen, without all the fuss you might expect. It’s truly a game-changer for your weeknight dinners or weekend brunches. You’ll love:
- How easy it is to follow, even if you’re new to bread baking.
- That incredible, crackly crust that tells you it’s perfectly baked.
- The soft, open crumb that’s just begging for butter or a dip in olive oil.
- The sheer joy of making something so impressive from scratch!
The Perfect French Bread Texture
Ah, the texture! This is where the magic really happens with this French bread. You’re going to get that iconic, shatter-crisp crust that sings when you tap it. And inside? It’s wonderfully soft, chewy, and full of those beautiful, irregular air pockets – just like you dream of. It’s truly the best of both worlds, and trust me, you’ll be so proud of it!

Essential Ingredients for Your Best French Bread
Alright, let’s talk ingredients! Making amazing French bread doesn’t require a huge list of fancy stuff. In fact, it’s quite simple, which is part of its charm. Here’s exactly what you’ll need to gather:
- 3 cups warm water (and I mean *warm*, between 105-115°F – think warm bathwater, not scalding!)
- 2 tablespoons active dry yeast (make sure it’s fresh!)
- 2 tablespoons granulated sugar
- 2 teaspoons salt (good old table salt works perfectly here)
- 7-8 cups all-purpose flour (don’t worry, we’ll talk about how much to use in a sec!)
Quality Ingredients for Authentic French Bread
Now, while the list is short, the quality of these few ingredients really, *really* matters for truly authentic French bread. That warm water is crucial for waking up our active dry yeast; a happy yeast means a good rise! And for the flour, I always go for a good quality all-purpose. It gives us that perfect balance of chewiness and airiness we’re looking for. Don’t skimp on the salt, either – it’s not just for flavor, it helps control the yeast and strengthens the dough. Trust me, these simple things make all the difference!
Step-by-Step Guide to Making French Bread
Alright, friends, this is where the magic happens! Don’t be intimidated; making French bread is a surprisingly straightforward process once you get the hang of it. I’m going to walk you through each step, just like I would if we were baking side-by-side in my kitchen. Follow these instructions, and you’ll be pulling out those gorgeous, golden loaves in no time. We’ll go from a simple mix to a beautiful, golden-brown crust, I promise!
Preparing Your French Bread Dough
First things first, grab a big bowl – seriously, a *big* one, because this dough is going to grow! Pour in your warm water (remember, that perfect bathwater temp?). Now, sprinkle in your active dry yeast and the sugar. Give it a gentle swirl and let it sit for about 5 minutes. You’re looking for it to get nice and foamy on top – that means your yeast is alive and ready to party! If it doesn’t foam, your yeast might be old, or your water wasn’t the right temperature, and you’ll need to start over (bummer, I know, but better now than after all that work!).
Once it’s foamy, stir in your salt. Then, add 3 cups of your all-purpose flour and mix it really well until there are no dry spots. Now for the rest of the flour! Add it gradually, about a cup at a time, mixing after each addition. You’re looking for a soft, slightly sticky dough that just pulls away from the sides of the bowl. Don’t add too much flour here; a softer dough makes for a lighter, airier French bread. Turn that dough out onto a lightly floured surface and get ready to knead! Knead for 8-10 minutes. You’ll feel it transform from shaggy to smooth and elastic. It’s a bit of a workout, but so worth it!
Shaping and Proofing Your French Bread
Once your dough is beautifully kneaded, lightly grease your big bowl (the same one you just used is fine!) and turn the dough over in it once to coat. Cover it with plastic wrap or a clean kitchen towel and pop it in a warm, draft-free spot. I like to put mine in an oven that’s been turned off but is still slightly warm from me preheating it for a minute. Let it rise for 1 to 1.5 hours, or until it’s doubled in size. This is its first proof, and it’s super important for flavor and texture!
Once it’s doubled, gently punch down the dough to release the air. Divide it into two equal portions. Now for the fun part: shaping! On a lightly floured surface, roll each portion into a rectangle, roughly 15×10 inches. Then, starting from a long side, roll it up tightly, like a sleeping bag. Pinch the seam really well to seal it, and then taper the ends to get that classic French bread shape. Place your beautiful loaves on a greased baking sheet. Cover them again and let them rise for another 30-45 minutes, or until they’ve doubled again. This second proof is key to that light, open crumb.
Baking Your Golden French Bread
While your loaves are doing their second rise, preheat your oven to 375°F (190°C). Once the loaves have doubled, grab a sharp knife – a serrated one works great, or even a razor blade if you’re fancy! Make 3-4 diagonal slits on the top of each loaf. This isn’t just for looks; it allows the bread to expand beautifully in the oven without tearing.
Pop your baking sheet into the preheated oven and bake for 25-30 minutes. You’re looking for a gorgeous golden-brown crust. To tell if it’s done, gently tap the bottom of a loaf – if it sounds hollow, it’s ready! If it feels dense or soft, give it a few more minutes. Every oven is a little different, so keep an eye on it. Once they’re perfectly baked, transfer them to a wire rack to cool completely. And I mean *completely*! Slicing into hot bread can make it gummy inside, and we want that perfect, airy texture. But trust me, the wait is worth it!

Pro Tips for Perfect French Bread
Okay, you’ve got the steps down, but here are a few little secrets I’ve picked up over the years that will take your French bread from “good” to “OMG, you *made* this?!” First, don’t be afraid of a little stickiness when you’re kneading. Adding too much flour is a common mistake and will give you dense, heavy loaves instead of that beautiful, airy crumb. Resist the urge to add more flour than the recipe calls for, even if it feels a bit tacky at first. Your hands will get messy, but it’s worth it!
Also, that warm, humid environment for rising? It’s your best friend. If your kitchen is cold, try putting your covered bowl in a turned-off oven with a pan of hot water on the rack below. This creates a mini proofing box! Finally, a little steam in the oven during the first few minutes of baking can work wonders for that super crusty exterior. You can achieve this by spritzing the oven walls with water or placing a pan of hot water on the bottom rack when you put the bread in. Trust me on these; they make all the difference!
Frequently Asked Questions About French Bread
Baking French bread at home is super rewarding, but it’s totally normal to have a few questions along the way! I get asked these a lot, so let’s tackle some of the most common ones to help you feel even more confident in your bread-making journey. Don’t worry, we’ve all been there!
Can I Make French Bread Ahead of Time?
You bet! If you want to get a head start, you can prepare the dough up to the first rise. After it’s doubled, punch it down gently, cover it tightly with plastic wrap, and pop it in the fridge for up to 24 hours. Just remember to let it come back to room temperature for about an hour before you shape and do the second rise. It’s a great trick for fresh French bread on demand!
Why Is My French Bread Not Crusty?
Ah, the elusive crisp crust! If your French bread isn’t as crusty as you’d like, there are a few culprits. First, make sure your oven is hot enough and that you’re baking it long enough. Sometimes, a little extra time (even 5-10 minutes) can make a huge difference. Also, consider adding some steam to your oven during the first part of baking. That’s the secret sauce for a truly crackly crust. A pan of hot water on the bottom rack or a quick spritz of water on the oven walls can work wonders!
What is the Best Way to Store French Bread?
Homemade French bread is best enjoyed the day it’s baked, honestly! But if you have leftovers, the best way to store it is at room temperature, loosely wrapped in a clean kitchen towel or placed in a paper bag. Avoid plastic bags, as they can trap moisture and make the crust soggy. For longer storage, you can slice it and freeze it in an airtight bag, then just toast or warm slices as needed. It’s almost like baking it fresh!
Serving Suggestions for Your Homemade French Bread
Okay, so you’ve got these warm, incredible loaves of French bread—now what?! The possibilities are practically endless! My absolute favorite is slicing it thick and dipping it into good olive oil with a sprinkle of flaky sea salt. But don’t stop there! It’s amazing alongside a hearty soup or stew, perfect for soaking up every last drop of delicious broth. Or, make it the star of your next sandwich night – it elevates even a simple ham and cheese. And for a real treat, try making some garlic bread or bruschetta. Honestly, this bread makes everything better!
Estimated Nutritional Information for French Bread
Just a quick note on nutrition for our wonderful French bread! The values provided are estimates, and they can vary quite a bit depending on the specific brands of ingredients you use (different flours, for example) and how big your slices end up being. Think of this as a helpful guide, not an exact science, okay? Enjoy every delicious bite!
Share Your French Bread Baking Success!
I absolutely *love* hearing from you! If you whip up a batch of this French bread, please, please, please come back and tell me all about it in the comments below. Did you love that crust? Did your kitchen smell amazing? Share your photos on social media too – tag me! It makes my day to see your baking triumphs, and it helps other home bakers feel inspired. Happy baking, friends!
Print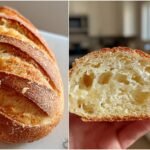
Unleash the 2-Hour French Bread Miracle
- Total Time: 2 hours 30 minutes
- Yield: 2 loaves 1x
- Diet: Vegetarian
Description
This recipe guides you through making classic French bread with a crisp crust and soft, airy interior. It is perfect for sandwiches, toast, or alongside your favorite meal.
Ingredients
- 3 cups warm water (105-115°F)
- 2 tablespoons active dry yeast
- 2 tablespoons sugar
- 2 teaspoons salt
- 7–8 cups all-purpose flour
Instructions
- In a large bowl, combine warm water, yeast, and sugar. Let stand for 5 minutes, or until foamy.
- Stir in salt and 3 cups of flour. Mix well.
- Gradually add remaining flour, 1 cup at a time, until a soft dough forms.
- Turn dough onto a lightly floured surface; knead for 8-10 minutes, or until smooth and elastic.
- Place dough in a greased bowl, turning once to coat. Cover and let rise in a warm place for 1-1.5 hours, or until doubled.
- Punch down dough. Divide into 2 equal portions.
- On a lightly floured surface, roll each portion into a 15×10-inch rectangle. Roll up tightly from a long side, pinching seams to seal. Taper ends.
- Place loaves on a greased baking sheet. Cover and let rise for 30-45 minutes, or until doubled.
- Preheat oven to 375°F (190°C).
- With a sharp knife, make 3-4 diagonal slits on top of each loaf.
- Bake for 25-30 minutes, or until golden brown and hollow-sounding when tapped.
- Cool on a wire rack.
Notes
- Ensure your yeast is active for proper rising.
- Do not add too much flour during kneading; the dough should remain soft.
- Adjust baking time based on your oven.
- Prep Time: 25 minutes
- Cook Time: 30 minutes
- Category: Bread
- Method: Baking
- Cuisine: French
Nutrition
- Serving Size: 1 slice
- Calories: 150
- Sugar: 2g
- Sodium: 230mg
- Fat: 1g
- Saturated Fat: 0g
- Unsaturated Fat: 0g
- Trans Fat: 0g
- Carbohydrates: 30g
- Fiber: 1g
- Protein: 5g
- Cholesterol: 0mg
Keywords: French bread, homemade bread, classic bread, crusty bread