
Oh, hey there, fellow food lover! Let me tell you, if there’s one thing that completely changed my snacking life, it’s learning how to make my own Chickpea Hummus. For years, I just grabbed those little plastic tubs from the grocery store, thinking, “Eh, hummus is hummus, right?” Boy, was I wrong!
The first time I whipped up a batch of homemade Chickpea Hummus, my jaw literally dropped. The creamy texture, the bright, fresh lemon, the subtle warmth of the garlic – it was a revelation! It tasted like sunshine and good vibes, nothing like the sometimes-gritty, often-bland store-bought stuff.
And the best part? It’s ridiculously easy! Seriously, we’re talking about just a few minutes of effort for something that tastes so incredibly vibrant and fresh. You’ll never go back to the pre-made kind, I promise you. This isn’t just a recipe; it’s a game-changer for your snack routine, your lunch wraps, and honestly, just your general happiness. Let’s make some magic!

Why You’ll Love This Chickpea Hummus Recipe
Okay, so why *this* Chickpea Hummus recipe? Because it’s everything you want in a dip and more! It’s ridiculously easy, comes together in a flash, and tastes so much better than anything you’ll find pre-made. Trust me, once you make this, you’ll be hooked. It’s truly a kitchen staple that brings smiles to everyone who tries it. Perfect for a quick snack or impressing your friends.
The Creamiest Chickpea Hummus
Oh, the texture! That’s where this recipe truly shines. We’re talking silky smooth, luxurious, melt-in-your-mouth creamy Chickpea Hummus. No gritty bits here, just pure, velvety goodness. That perfect consistency comes from a few little tricks and the right balance of ingredients, and I’ll share all my secrets to get it just right.
Easy and Quick Chickpea Hummus
Got 10 minutes? Then you’ve got time to make this Chickpea Hummus! Seriously, it’s that fast. Pop everything into a food processor, give it a whirl, and boom – fresh, homemade hummus ready to dive into. It’s perfect for those busy weeknights when you need a healthy snack in a hurry, or when unexpected guests drop by!
Essential Ingredients for Perfect Chickpea Hummus
Alright, let’s talk ingredients! You don’t need a crazy long list for this Chickpea Hummus, which is part of its charm. We’re keeping it simple and fresh, just like Grandma would want. Here’s what you’ll need to gather:
- 1 can (15 ounces) chickpeas, make sure they’re drained and rinsed really well
- 1/4 cup tahini – this is non-negotiable for that authentic flavor!
- 2 tablespoons fresh lemon juice (please, no bottled stuff here!)
- 1 clove garlic, minced – or a little more if you’re a garlic fiend like me!
- 2 tablespoons olive oil, plus a little extra for drizzling at the end
- 1/2 teaspoon ground cumin
- 1/4 teaspoon salt (you can always add more later, to taste)
- 2-3 tablespoons cold water – this is our secret weapon for creaminess!
Key Components for Your Chickpea Hummus
Every ingredient here plays a super important role in making this Chickpea Hummus sing! The tahini, oh my goodness, that’s what gives it that signature nutty depth and helps make it incredibly smooth. And fresh lemon juice? That’s your bright, zesty kick that cuts through the richness and makes you want to go back for more. They’re truly the heart of the flavor!
Equipment Needed for Your Chickpea Hummus
You know, for something that tastes so fancy, you really don’t need a whole lot of special gadgets to make this amazing Chickpea Hummus. That’s one of my favorite things about it! We’re keeping it pretty minimal here, focusing on just a couple of key items that will make your life super easy and your hummus perfectly smooth.
Tools for Making Chickpea Hummus
The absolute star of the show for making this Chickpea Hummus is a good food processor. A high-speed blender can work too, but I find the food processor just nails that creamy texture every time. That’s really it!
How to Make Chickpea Hummus: Step-by-Step Instructions
Alright, let’s get to the fun part – actually making this incredible Chickpea Hummus! Don’t worry, it’s super straightforward. The key is just a little patience and paying attention to textures. We’re going to blend everything up into creamy perfection, and I’ll walk you through each step so you get it just right. It’s truly easier than you think, and the results are so worth it!
Preparing Your Chickpea Hummus Base
First things first, grab your trusty food processor. Toss in the drained and rinsed chickpeas, tahini, fresh lemon juice, minced garlic, olive oil, cumin, and salt. Now, hit that button and let it rip! You’ll see it start to come together, looking a bit thick and pasty at first. Don’t be shy; stop the processor every now and then to scrape down the sides with a spatula. This makes sure everything gets beautifully incorporated and you don’t end up with chunky bits in your smooth Chickpea Hummus.
Achieving the Perfect Consistency for Chickpea Hummus
This is where the magic happens for that super creamy Chickpea Hummus! With the food processor still running (or pulsing, if you’re feeling cautious), start adding the cold water, just one tablespoon at a time. This is really important – don’t dump it all in! Slowly add it until your hummus reaches that dreamy, smooth, and spreadable consistency you’re looking for. It might take 2 tablespoons, it might take 3. You’ll know it’s ready when it flows smoothly but still holds its shape a little. Taste it, too! Now’s the time to add a little more salt or lemon if you think it needs it.
Serving Your Delicious Chickpea Hummus
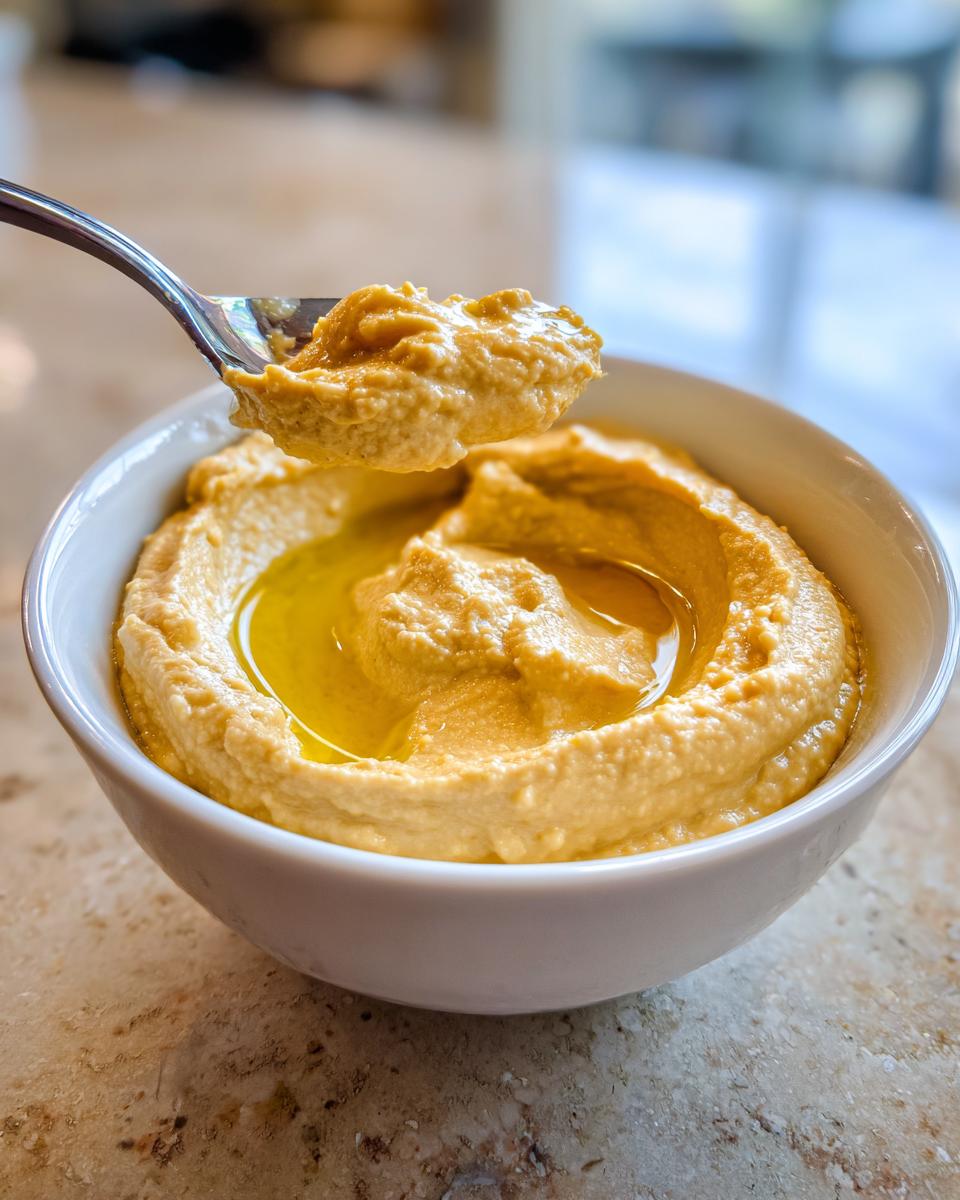
Once your Chickpea Hummus is perfectly smooth and seasoned, transfer it to your favorite serving bowl. Now for the final touch that makes it look as good as it tastes: a lovely drizzle of extra virgin olive oil right over the top. You can even make a little swirl with the back of a spoon if you’re feeling fancy! And if you want to jazz it up even more, a sprinkle of paprika, some chopped fresh parsley, or a dash of sumac are all fantastic. Now, dig in!

Tips for the Best Chickpea Hummus
Okay, so you’ve got the basic steps down for this amazing Chickpea Hummus, but I’ve got a few extra tips that will take your hummus from great to absolutely legendary. These are those little insider secrets that really make a difference, ensuring every batch is perfectly smooth, flavorful, and just begging to be devoured. Trust me, these small efforts yield big results when it comes to homemade hummus!
Customizing Your Chickpea Hummus
Don’t be afraid to make this Chickpea Hummus your own! Once you’ve got the basic recipe down, play around with it. Love a tangier hummus? Add a little more lemon juice. Need more zing? A pinch more salt or even a tiny dash of cayenne pepper can wake it right up. And for garnishes, the sky’s the limit! Paprika, chopped fresh parsley, or a sprinkle of sumac are classics, but try a swirl of pesto or some toasted pine nuts for a real treat.
Common Questions About Chickpea Hummus
I get a lot of questions about making this Chickpea Hummus, and I love answering them because it means more people are making their own delicious, fresh hummus! Here are a few of the most popular ones I hear. Don’t hesitate to ask if you have more – I’m always happy to help you get the best results from your homemade hummus!
Can I Make Chickpea Hummus Ahead of Time?
Absolutely, you can! In fact, sometimes I think this Chickpea Hummus tastes even better after a few hours in the fridge, as the flavors really get a chance to meld. Just make sure to store it in an airtight container. It’ll stay fresh and delicious for about 3-5 days. If you notice it drying out a little, just stir in a tiny bit more cold water or a drizzle of olive oil before serving.
What Can I Serve with Chickpea Hummus?
Oh, the possibilities are endless for this amazing Chickpea Hummus! My go-to is always warm pita bread, but it’s also fantastic with crunchy veggie sticks – think carrots, celery, bell peppers, or cucumber. It’s a great spread for sandwiches and wraps, too. You can even dollop it onto salads or use it as a base for a grain bowl. Honestly, once you start making it, you’ll find a million ways to enjoy it!
Storing Your Homemade Chickpea Hummus
So, you’ve made a glorious batch of Chickpea Hummus, and maybe, just maybe, you have some left over (though I doubt it, this stuff is addictive!). Proper storage is key to keeping it fresh and tasting amazing for days. It’s super simple, but a couple of little tricks will make all the difference in maintaining that creamy texture and vibrant flavor you worked so hard to achieve.
Keeping Your Chickpea Hummus Fresh
To keep your Chickpea Hummus at its best, spoon it into an airtight container. If you want to be extra fancy, you can even smooth out the top and drizzle a thin layer of olive oil over it before sealing – this creates a little barrier that helps prevent it from drying out. Pop it in the fridge, and it’ll happily last for 3 to 5 days. Easy peasy!

Estimated Nutritional Information for Chickpea Hummus
I know some of you like to keep an eye on the numbers, so here’s a quick look at the estimated nutritional info for this Chickpea Hummus recipe. Based on roughly 1/4 of the recipe per serving, you’re looking at about 200 calories, with 14g of fat (just 2g saturated!), 15g of carbs, and a nice 6g of protein. Just remember, these are estimates, and the exact values can wiggle a bit depending on the brands you use and how generous you are with that final olive oil drizzle!
Enjoy Your Homemade Chickpea Hummus!
So, there you have it! My absolute favorite, super simple, and incredibly delicious Chickpea Hummus recipe. I really, really hope you give it a try. There’s nothing quite like the taste of homemade, and I promise you, this one is a winner. When you make it, snap a pic and tag me on social media, or even better, leave a comment below and let me know how it turned out for you! Happy dipping!
Print
Fail-Proof Chickpea Hummus: A 10-Minute Delight
- Total Time: 10 minutes
- Yield: 4 servings 1x
- Diet: Vegan
Description
A classic, creamy chickpea hummus recipe, perfect for dipping or spreading.
Ingredients
- 1 can (15 ounces) chickpeas, drained and rinsed
- 1/4 cup tahini
- 2 tablespoons fresh lemon juice
- 1 clove garlic, minced
- 2 tablespoons olive oil, plus more for serving
- 1/2 teaspoon ground cumin
- 1/4 teaspoon salt
- 2–3 tablespoons cold water
Instructions
- Combine chickpeas, tahini, lemon juice, garlic, olive oil, cumin, and salt in a food processor.
- Process until smooth, scraping down the sides as needed.
- With the food processor running, gradually add cold water, 1 tablespoon at a time, until the hummus reaches your desired consistency.
- Transfer hummus to a serving bowl.
- Drizzle with additional olive oil before serving.
Notes
- For extra smooth hummus, remove the skins from the chickpeas before blending.
- Adjust lemon juice and salt to taste.
- Garnish with paprika, chopped parsley, or a sprinkle of sumac.
- Prep Time: 10 minutes
- Cook Time: 0 minutes
- Category: Dip
- Method: Blended
- Cuisine: Middle Eastern
Nutrition
- Serving Size: 1/4 of recipe
- Calories: 200
- Sugar: 0g
- Sodium: 250mg
- Fat: 14g
- Saturated Fat: 2g
- Unsaturated Fat: 12g
- Trans Fat: 0g
- Carbohydrates: 15g
- Fiber: 4g
- Protein: 6g
- Cholesterol: 0mg
Keywords: hummus, chickpea, dip, vegan, healthy, appetizer