
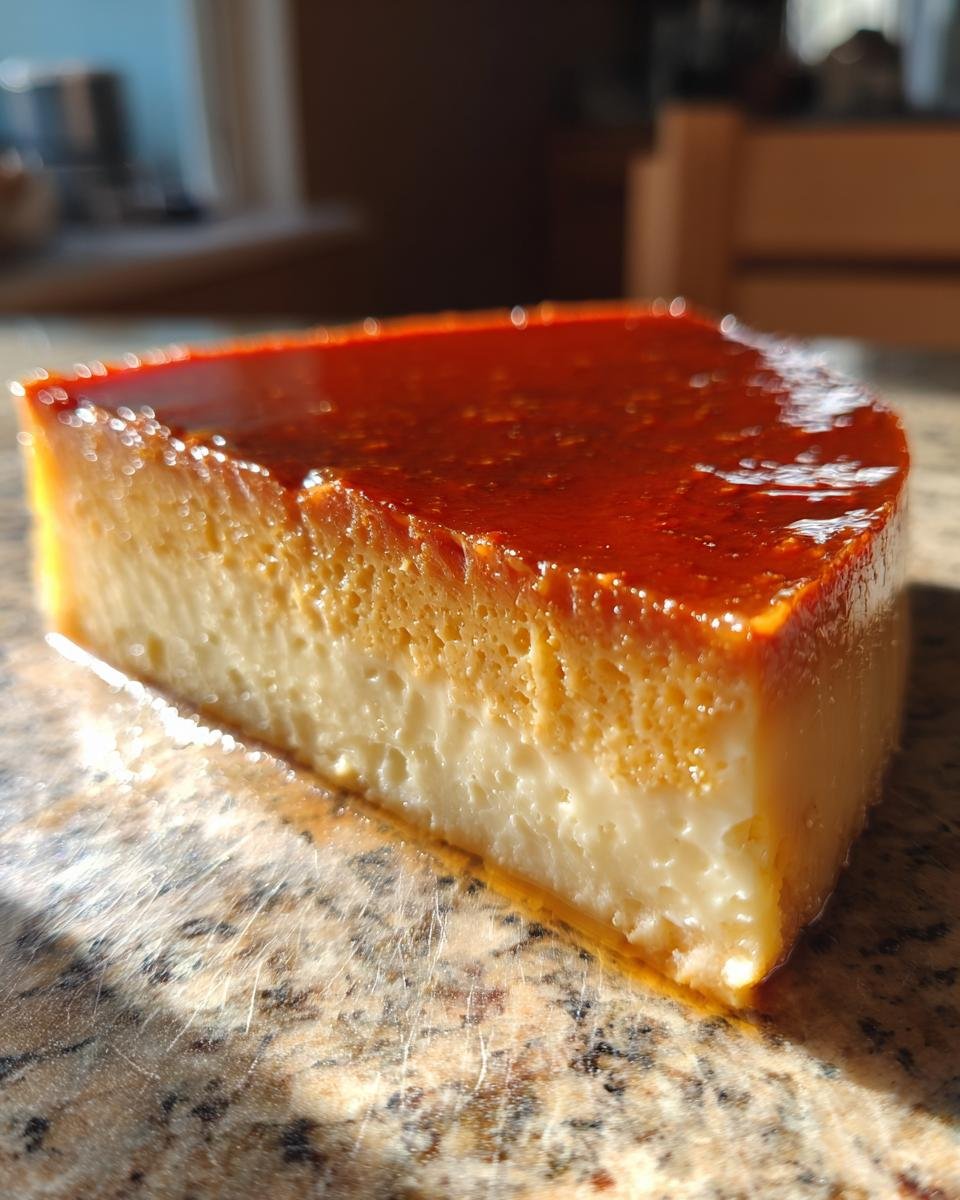
Oh, flan! But not just any flan, you guys. We’re talking about a Flan with Gelatin Layers that’s a total showstopper. I remember the first time I saw one of these beauties; it was at my cousin Sofia’s wedding reception in Mexico. It wasn’t just dessert; it was art! The way the light hit those distinct, smooth layers, all swimming in that gorgeous amber caramel… I was hooked. It’s got this incredibly silky texture that just melts in your mouth, thanks to a little trick I’m about to share. Trust me, this layered flan is going to be your new favorite way to impress.

Why You’ll Love This Flan with Gelatin Layers
Honestly, this recipe is a winner for so many reasons. It’s the kind of dessert that looks super fancy but is surprisingly easy to whip up. You’ll want to make it again and again!
- Visually Stunning Presentation: That layered effect is just gorgeous, and the deep caramel glaze makes it look like a million bucks. It’s a real showstopper!
- Incredibly Smooth Texture: Thanks to the gelatin, you get this unbelievably smooth, melt-in-your-mouth texture that’s just divine.
- Rich Caramel Flavor: It’s got that classic, comforting flan taste with that perfect hint of burnt sugar sweetness that everyone loves.
- Simple, No-Bake Preparation: Seriously, no oven needed! You just mix, chill, and unmold. It’s so forgiving and totally doable for any home cook.
Essential Ingredients for Flan with Gelatin Layers
Okay, so gathering your ingredients is the first step to flan greatness! And for this Flan with Gelatin Layers, we want the good stuff. Don’t worry, it’s all pretty standard pantry stuff, but the exact amounts really make a difference here.
For the Caramel
You only need one thing for this part, but pay attention! We need 1/4 cup of granulated sugar. That’s it! Just plain old white sugar. The trick here is to watch it like a hawk when it’s melting so it turns a beautiful amber color and doesn’t go too dark and bitter.
For the Flan Base
This is where the magic happens! You’ll need 1 can (14 oz) of sweetened condensed milk – the super thick, sweet kind. Then, grab 1 can (12 oz) of evaporated milk; this gives it that lovely, creamy texture without being too heavy. Next, we need 4 large eggs. Make sure they’re large, as that’s what the recipe is balanced around. And of course, 1 teaspoon of vanilla extract for that classic flan flavor. The secret weapon for our layers? That’ll be 2 envelopes of unflavored gelatin, which you’ll need to bloom in 1/2 cup of cold water. Blooming just means letting the gelatin sit in the water for a few minutes until it gets all thick and jelly-like. It’s crucial for getting those smooth layers!
Crafting Your Flan with Gelatin Layers: Step-by-Step
Alright, let’s get down to business and make this amazing Flan with Gelatin Layers! It sounds fancy, but honestly, it’s pretty straightforward. Just follow these steps, and you’ll have a dessert that’ll make everyone ask for the recipe.
Perfecting the Caramel Base
First things first, the caramel! Grab a medium saucepan and dump in your 1/4 cup of granulated sugar. Put it over medium heat. Now, this is important: don’t stir it right away! Let the edges start to melt and turn golden. Once you see it melting, you can gently swirl the pan or use a heatproof spatula to help it along. You want a beautiful amber color, like liquid gold. Be super careful here – burnt caramel tastes awful! As soon as it’s that perfect amber, carefully pour it into your 9-inch flan mold or a nice glass baking dish. Swirl it around quickly to coat the bottom. It’ll harden up, and that’s exactly what we want!
Blooming the Gelatin
While the caramel is setting, let’s get our gelatin ready. In a small bowl, sprinkle your 2 envelopes of unflavored gelatin over 1/2 cup of cold water. Just let it sit there for about 5 minutes. You’ll see it get thick and sort of wiggly, like jelly. This is called “blooming,” and it’s key to making sure the gelatin dissolves smoothly into our flan mixture. If you skip this, you might get little gelatin bits in your flan, and nobody wants that!
Creating the Silky Flan Mixture
Now for the blender! Toss in your 1 can (14 oz) of sweetened condensed milk, 1 can (12 oz) of evaporated milk, those 4 large eggs, and the 1 teaspoon of vanilla extract. Blend this until it’s super smooth and creamy. Next, gently warm your bloomed gelatin. You can pop it in the microwave for about 15-20 seconds, just until it liquefies. Be careful not to overheat it! Pour this liquid gelatin into the blender with the milk and egg mixture. Give it a quick blend, just enough to mix it all together really well. You don’t want to over-blend here, or you might get too many bubbles.
The Crucial Chilling Process
Pour that lovely, smooth mixture right into your caramel-coated mold. Cover the top tightly with aluminum foil. This keeps any fridge smells from getting into your flan. Now comes the hardest part: waiting! Pop it into the refrigerator for at least 4 to 6 hours. Honestly, overnight is even better if you can manage it. You want it to be completely firm. If it’s still a bit wobbly, it won’t unmold nicely, and then you’ll have a mess instead of a masterpiece!
Effortless Unmolding Technique
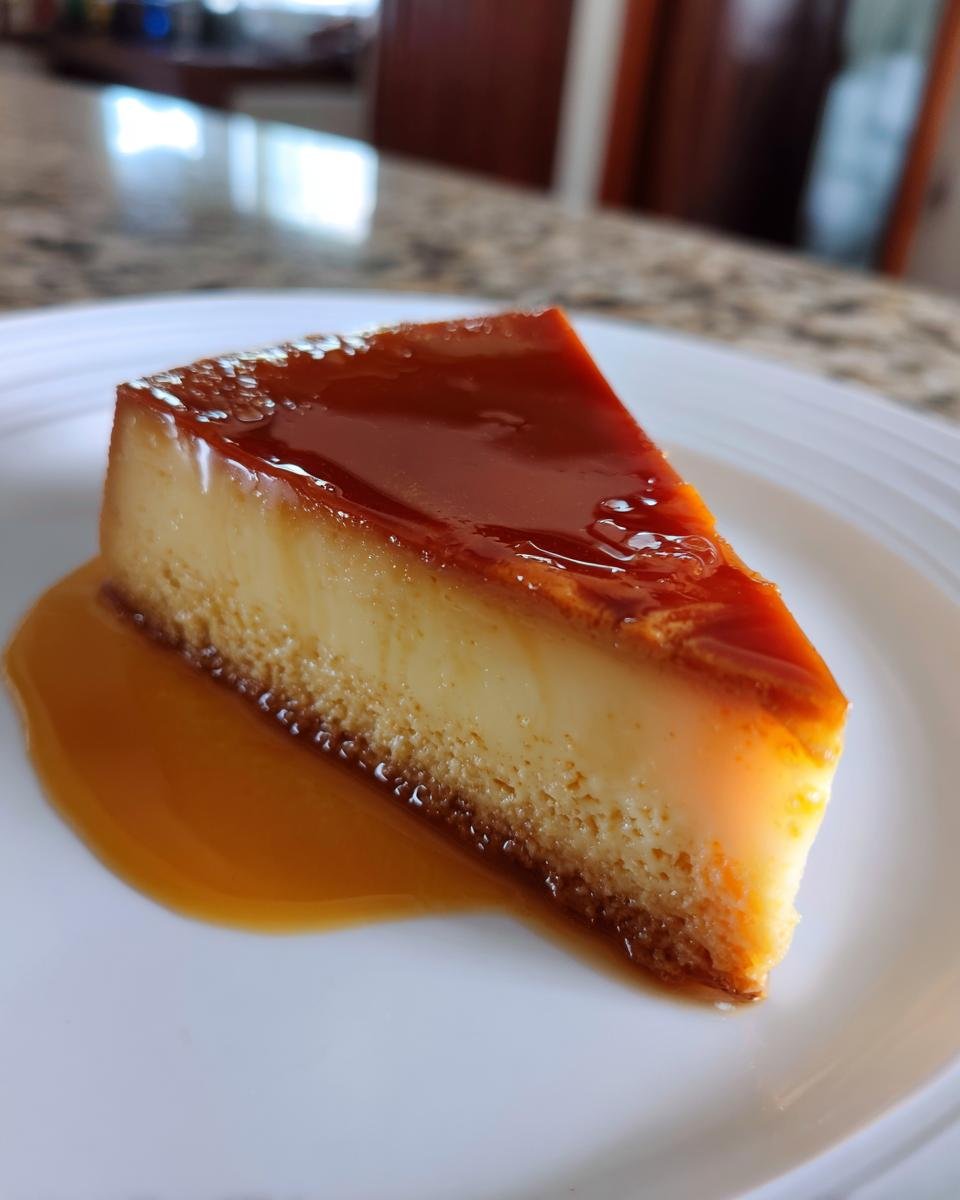
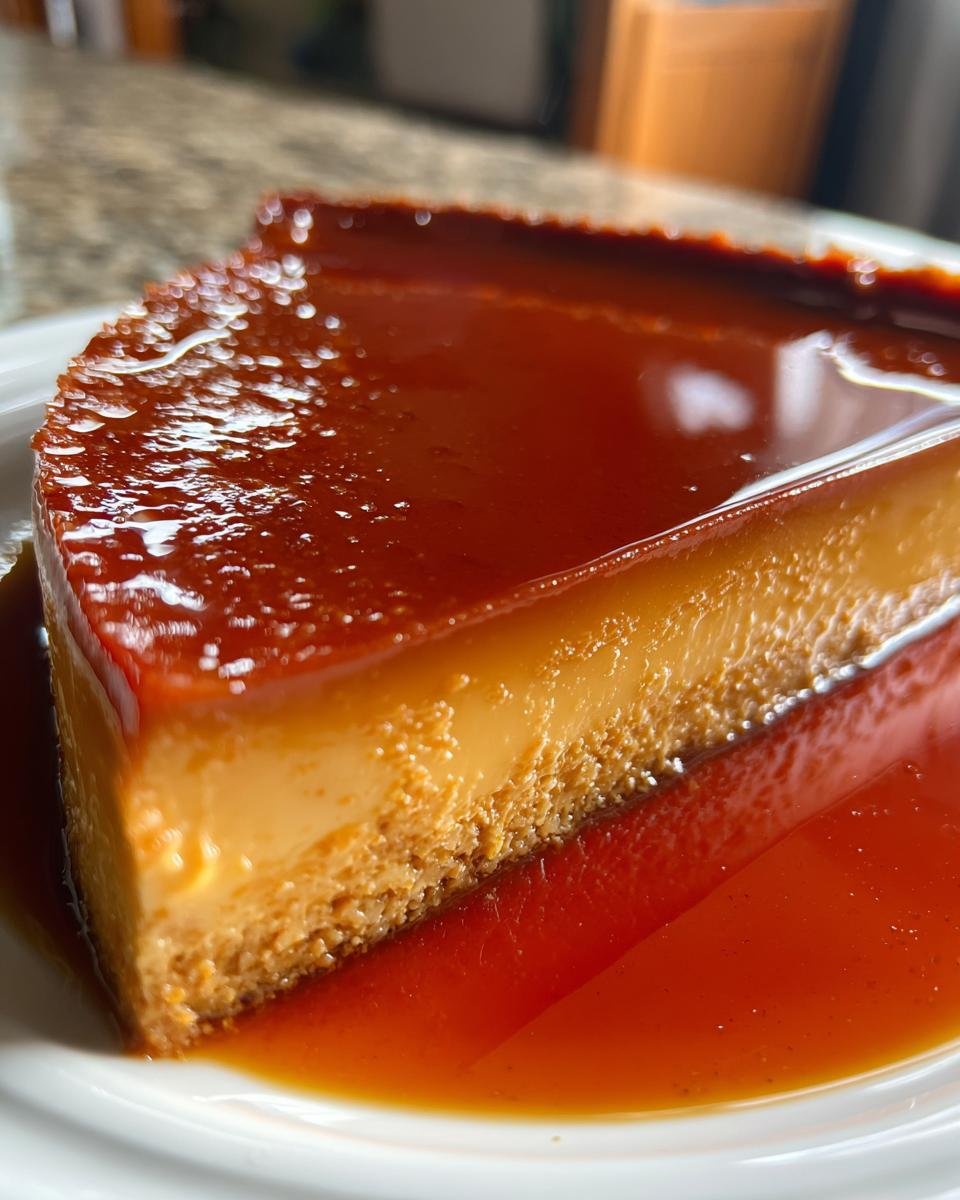
The moment of truth! To unmold your gorgeous Flan with Gelatin Layers, run a thin, flexible knife or a small offset spatula around the inside edge of the mold. This just loosens it up. Then, place your serving plate right on top of the mold. Take a deep breath, and quickly and confidently invert the mold and plate together. Lift the mold straight up, and hopefully, all that beautiful flan, with its caramel sauce, will slide right out onto the plate. If any caramel sticks, just scrape it out and drizzle it over the top. Voilà!
Tips for Flawless Flan with Gelatin Layers
Making a perfect Flan with Gelatin Layers is totally achievable, but there are a few little things I’ve learned along the way that really make a difference. Think of these as my little secrets to flan success!
Caramel Caution: Avoiding Bitterness
Seriously, watch that caramel like a hawk! It goes from perfect amber to burnt and bitter SO fast. You want a nice, rich golden-brown, not a dark, angry brown. If it smells like it’s burning, it probably is, and you’ll need to start over. A little bitterness can totally ruin the sweet creaminess of the flan, so trust your eyes and nose on this one.
Gelatin Integration for Smoothness
When you add the bloomed gelatin, make sure it’s just liquid, not hot. If it’s too hot, it can actually cook the eggs a little, which we definitely don’t want. A quick 15-20 second zap in the microwave is usually perfect. And blend it in just long enough to combine; over-blending can make it too frothy and might create air bubbles in your beautiful layers.
Achieving the Perfect Chill
Patience is key here, my friends! That 4-6 hour chill time isn’t just a suggestion; it’s crucial for the gelatin to set properly and give you those distinct, smooth layers. If you try to unmold it too early, it’ll just be a soupy mess. I usually make mine the night before to be safe. Trust me, the wait is SO worth it for that perfect, firm texture!
Variations to Inspire Your Flan with Gelatin Layers
While this Flan with Gelatin Layers is absolutely divine as is, sometimes it’s fun to play around and make it your own! I love tweaking desserts, and flan is no exception. These little changes can really elevate your dessert game and make it even more special for your guests.
Flavor Infusions
Want to jazz things up? You can totally add some extra flavor to the flan base before you blend it all up. A little bit of citrus zest, like from an orange or a lime, adds a bright, fresh note that cuts through the richness beautifully. Or, if you’re a coffee lover, try adding a teaspoon of instant espresso powder – it gives it a lovely mocha vibe that’s oh-so-delicious!
Topping Ideas
The caramel sauce from the mold is fantastic, but sometimes I like to add a little something extra on top. Fresh berries, like raspberries or sliced strawberries, add a pop of color and a fresh tartness that’s just lovely. A dollop of lightly sweetened whipped cream is also a classic for a reason – it adds another layer of creamy goodness and looks so pretty!
Serving and Storing Your Flan with Gelatin Layers
Now that you’ve made this stunning Flan with Gelatin Layers, let’s talk about how to enjoy it best! It’s seriously delicious on its own, but a few little extras can make it even more special. And don’t worry if you have leftovers, because this flan keeps beautifully.
Serving Suggestions
The best way to serve this flan is chilled, right after you’ve unmolded it onto your prettiest serving plate. That caramel sauce from the bottom of the mold is pure liquid gold, so make sure you scrape every last bit out and drizzle it over the top. If you want to add a little something more, a few fresh berries, like raspberries or sliced strawberries, give it a lovely pop of color and a bit of tartness to balance the sweetness. A small dollop of freshly whipped cream is also never a bad idea!
Leftover Perfection
If, by some miracle, you have any flan left (which I doubt!), it stores really well. Just cover the serving plate tightly with plastic wrap or transfer any remaining flan to an airtight container. It’ll keep nicely in the refrigerator for about 3 to 4 days. The texture stays wonderfully smooth and creamy. Since it’s served cold, there’s no need to reheat it; just grab a fork and enjoy another delicious slice!
Frequently Asked Questions About Flan with Gelatin Layers
Got questions about making this amazing Flan with Gelatin Layers? I totally get it! It’s always good to know the little tricks. Here are some things people often ask me:
Can I make Flan with Gelatin Layers ahead of time?
Absolutely! This is one of my favorite make-ahead desserts. In fact, I think it’s even better when it’s had a good long chill. You can easily make it the night before your party or gathering. Just make sure it’s covered tightly in the fridge so it stays perfectly fresh and firm.
What is the best way to unmold Flan with Gelatin Layers?
The key is to loosen the edges first! Run a thin, flexible knife or an offset spatula all around the inside edge of the mold. Then, place your serving plate on top and do a swift, confident flip. If you’re worried, you can even briefly dip the bottom of the mold in hot water for just a few seconds – this helps loosen the caramel and the flan. Then, flip it over quickly!
Why is my Flan with Gelatin Layers not firm?
Usually, this happens if it hasn’t chilled long enough, or sometimes if the gelatin wasn’t properly bloomed or incorporated. Make sure you’re giving it at least 4-6 hours, but overnight is best! Also, double-check that you used the right amount of unflavored gelatin. Too little, and it won’t set up firm enough.
Can I use a different type of mold for Flan with Gelatin Layers?
Yes, you can! While a traditional flan mold or a glass baking dish works beautifully, you can also use individual ramekins or even silicone molds. Just adjust the chilling time slightly for smaller molds – they might set a bit faster. For silicone molds, make sure the caramel coats the bottom well before you pour in the flan mixture.
Nutritional Estimate for Flan with Gelatin Layers
Just a little note on the nutrition facts for this delicious Flan with Gelatin Layers: these numbers are estimates. They can really change depending on the specific brands of condensed milk or evaporated milk you use, or even how thick your caramel layer turns out! So, think of these as a general guide rather than exact science. Enjoy every bite!

Amazing Flan with Gelatin Layers 4 Hours
- Total Time: 4 hours 30 minutes
- Yield: 8 servings 1x
- Diet: Vegetarian
Description
A visually stunning flan featuring distinct layers created with gelatin, offering a smooth texture and a rich caramel flavor.
Ingredients
- 1 can (14 oz) sweetened condensed milk
- 1 can (12 oz) evaporated milk
- 4 large eggs
- 1 teaspoon vanilla extract
- 1/4 cup granulated sugar for caramel
- 2 envelopes unflavored gelatin
- 1/2 cup cold water
Instructions
- Prepare the caramel: Heat granulated sugar in a saucepan over medium heat until it melts and turns amber. Pour into a 9-inch round flan mold or baking dish. Swirl to coat the bottom.
- Dissolve gelatin: Sprinkle gelatin over cold water in a small bowl. Let it sit for 5 minutes to bloom.
- Blend base: In a blender, combine condensed milk, evaporated milk, eggs, and vanilla extract. Blend until smooth.
- Incorporate gelatin: Gently warm the bloomed gelatin (microwave for 15-20 seconds) until liquid. Add the liquid gelatin to the blender mixture. Blend briefly to combine.
- Pour and chill: Pour the mixture into the caramel-coated mold. Cover with foil. Refrigerate for at least 4-6 hours, or until firm.
- Unmold: To unmold, run a thin knife around the edge of the flan. Place a serving plate over the mold and quickly invert.
- Serve: Drizzle with any caramel sauce from the mold.
Notes
- Ensure the caramel is not burnt to avoid a bitter taste.
- Chill thoroughly for the best texture and easy unmolding.
- Prep Time: 20 minutes
- Cook Time: 10 minutes (for caramel)
- Category: Dessert
- Method: Baking/Chilling
- Cuisine: Latin American
Nutrition
- Serving Size: 1 slice
- Calories: 350
- Sugar: 50g
- Sodium: 120mg
- Fat: 12g
- Saturated Fat: 7g
- Unsaturated Fat: 5g
- Trans Fat: 0g
- Carbohydrates: 60g
- Fiber: 0g
- Protein: 10g
- Cholesterol: 90mg
Keywords: flan, gelatin, layered dessert, caramel, custard, no-bake, latin dessert