
Oh, you guys! If there’s one thing I’ve learned from years of throwing parties, it’s that a good dip is the absolute heart of any gathering. And when I say “good dip,” I’m really talking about *the* 7 Layer Dip. Seriously, this isn’t just any old appetizer; it’s practically a legend in its own right. Every time I bring this vibrant, loaded dish to a potluck, it’s the first thing to disappear. I’ve seen it happen countless times – people practically elbowing each other for the last scoop! It’s just that universally loved, you know?
I swear, making this 7 Layer Dip feels almost like cheating because it’s so incredibly easy, yet it looks like you’ve slaved away in the kitchen. No cooking required, just a little layering magic! What I love most about it is how it brings everyone together, huddled around the bowl, scooping up all those amazing flavors. Trust me, after years of perfecting classic party recipes, this one is a true winner that never, ever lets you down.

Why You’ll Love This 7 Layer Dip
So, why is *this* 7 Layer Dip recipe the one you’ll keep coming back to? Well, for starters, it’s just so darn easy! Seriously, no cooking, no fuss, just pure deliciousness. It’s got that perfect balance of creamy, zesty, and savory flavors that makes every single bite a little party in your mouth. Plus, it’s super versatile – you can totally tweak it to your liking, but honestly, the classic combo is just perfection. It’s a guaranteed crowd-pleaser, and you’ll love how quickly it comes together for any get-together.
The Ultimate Party 7 Layer Dip
This isn’t just a dip; it’s practically a party essential! I’ve seen platters of this 7 Layer Dip vanish faster than you can say “more chips, please!” It’s the ultimate go-to appetizer because everyone, and I mean *everyone*, absolutely adores it. It just screams “celebration,” and it’s always the star of the snack table.
Essential Ingredients for Your 7 Layer Dip
Alright, let’s talk ingredients! One of the best things about this 7 Layer Dip is that it uses super simple, easy-to-find stuff. You won’t need to hunt down anything fancy, just good, fresh ingredients. Here’s exactly what you’ll need to make this magic happen:
- 1 (16 ounce) can refried beans (I usually grab the traditional kind, nothing too spicy, so everyone can enjoy!)
- 1 (1.25 ounce) package taco seasoning mix (the regular kind works perfectly to give those beans a zesty kick)
- 1 (8 ounce) container sour cream (full-fat gives the best creaminess, trust me!)
- 1 (15 ounce) can salsa (your favorite mild or medium, whatever you like!)
- 2 ripe avocados, mashed (we’ll make fresh guacamole, yum!)
- 1 tablespoon lime juice (freshly squeezed is always best!)
- 1/2 teaspoon salt
- 1/4 teaspoon black pepper
- 2 cups shredded Cheddar cheese (a good sharp or medium cheddar is fantastic)
- 1 (2.25 ounce) can sliced black olives, drained (those little rings are just perfect)
- 1/2 cup chopped green onions (fresh and vibrant for that top layer!)
Gathering Your 7 Layer Dip Components
When you’re at the grocery store, try to pick out the best stuff you can find! For those avocados, you want ones that feel slightly soft when you gently squeeze them, but not mushy. That tells you they’re perfectly ripe and ready for mashing. And for the cheese, I always go for a block of cheddar and shred it myself – it just melts better and tastes fresher than pre-shredded, but pre-shredded works in a pinch too! Just make sure your beans and salsa are brands you love, since they’re big flavor players here.
Crafting Your Perfect 7 Layer Dip: Step-by-Step Instructions
Okay, now for the fun part: putting it all together! This is where the magic happens, and honestly, it’s so simple you’ll wonder why you haven’t made this a weekly thing. No cooking involved, just a bit of mixing and layering. Get ready for some serious compliments!
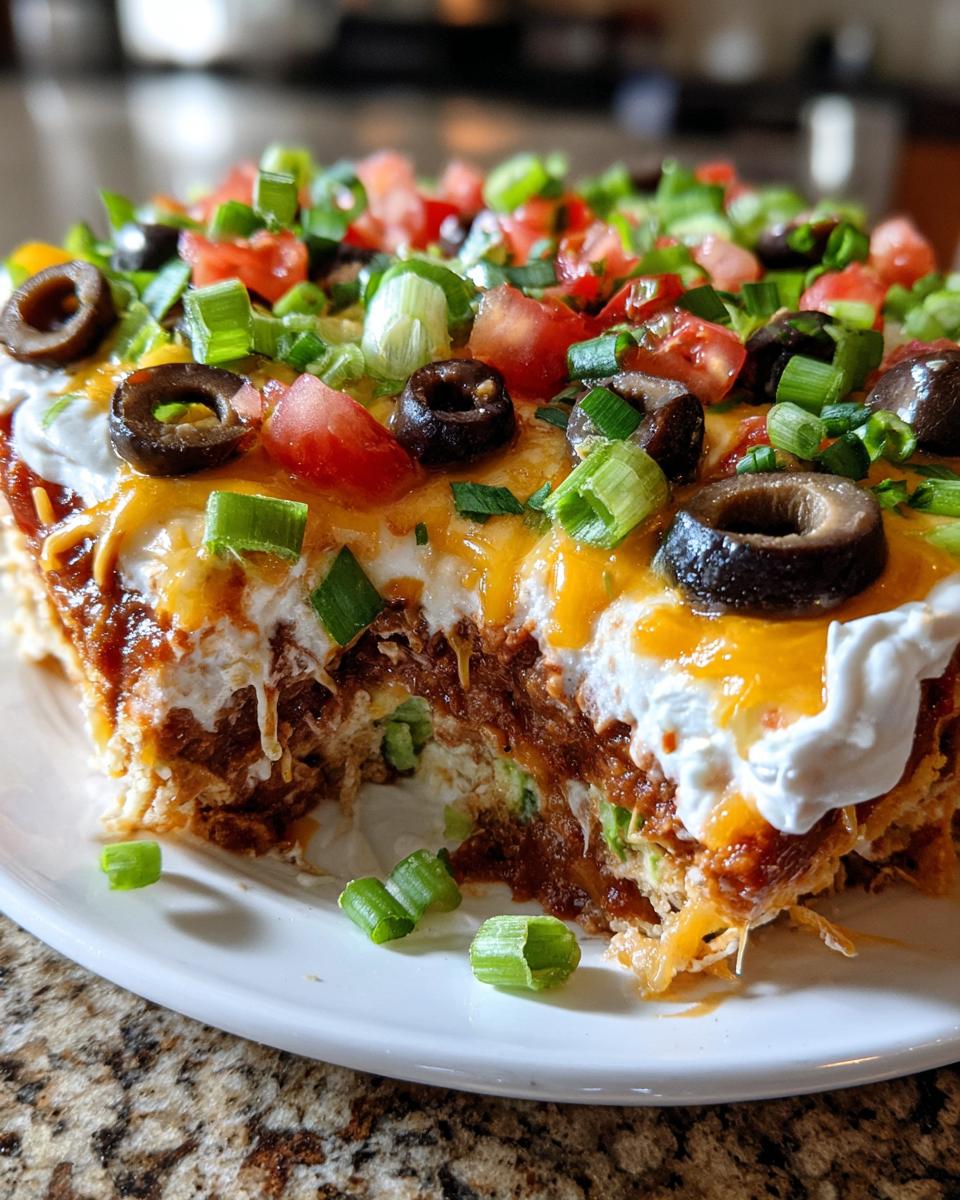
- First, the Beans: Grab a medium bowl and toss in your refried beans. Now, sprinkle that taco seasoning mix right over them. Give it a good stir until it’s all mixed in and those beans are smelling super savory. Once it’s nicely combined, spread this bean mixture evenly onto the bottom of a large serving platter or a 9×13 inch dish. This is your foundation, so make it nice and flat!
- Next, the Guac: In another bowl, it’s time for some fresh guacamole! Mash up your two ripe avocados. Then, quickly stir in the lime juice, salt, and pepper. The lime juice isn’t just for flavor; it helps keep your guac from turning brown too fast. Once it’s perfectly creamy (or a little chunky, if you like!), gently spread this vibrant green layer right over your seasoned beans. Try not to mix them too much!
- Smooth it with Sour Cream: Now for the cooling layer! Take your container of sour cream and carefully spread it evenly over the guacamole. This layer is usually the thickest and creamiest, providing a lovely contrast to the zesty layers.
- Salsa Time! Spoon your favorite salsa (mild, medium, or hot – your choice!) over the sour cream. Don’t go crazy with a super watery salsa here; a thicker, chunkier one works best so it doesn’t make your dip runny.
- Cheese, Please! Sprinkle your shredded Cheddar cheese generously over the salsa layer. This is where it starts to look really good, right?
- Olive Perfection: Next up, the black olives! Arrange your drained, sliced black olives over the cheese. I like to spread them out so you get a little bit in every scoop.
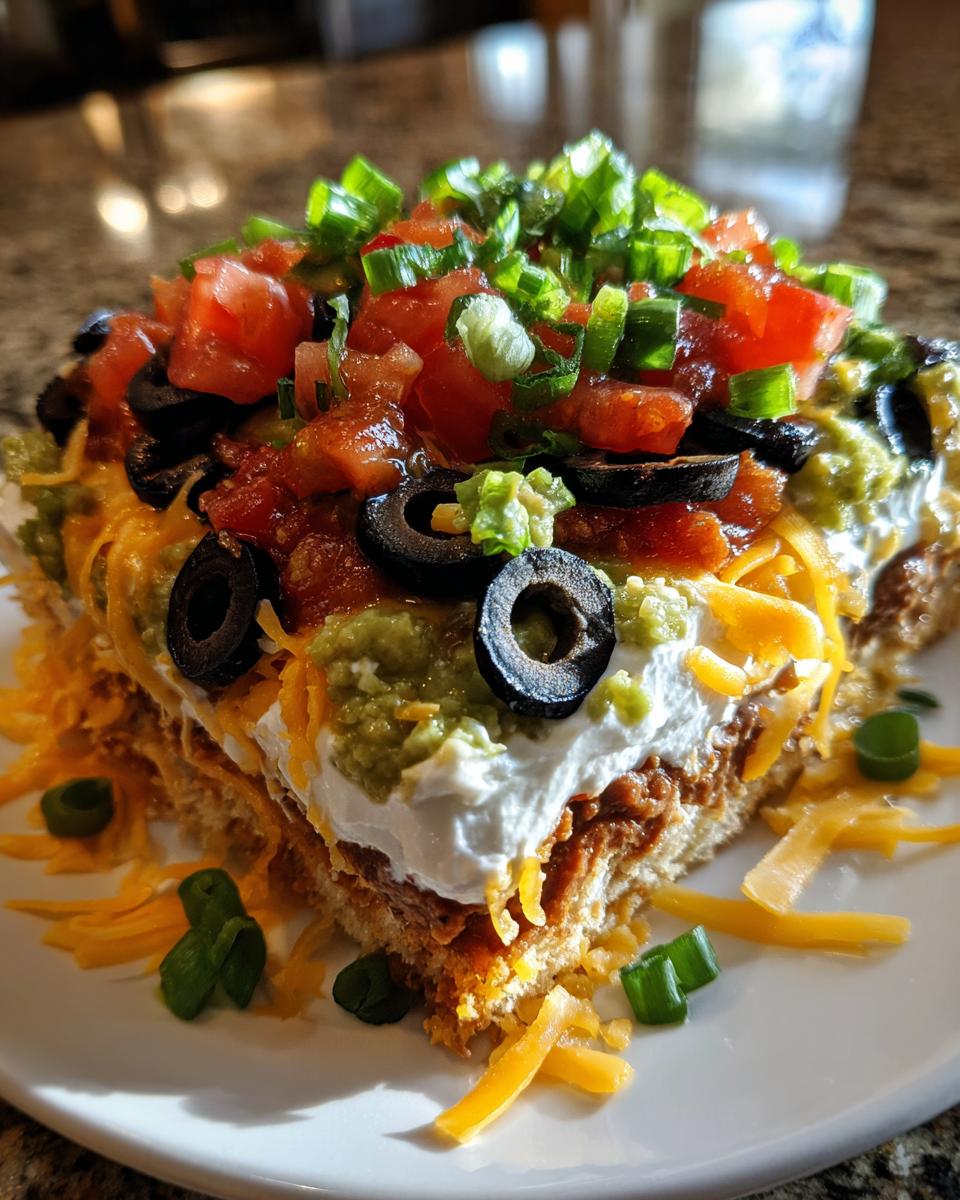
- Finally, Green Onions: For the grand finale, sprinkle your chopped green onions over the very top. These add a lovely fresh crunch and a pop of color that just makes the whole thing sing!
- Chill Out: Once all your layers are in place, pop your beautiful 7 Layer Dip into the fridge. Let it chill for at least 30 minutes. This isn’t just about getting it cold; it helps all those amazing flavors meld together, making it even more delicious.
Assembling the Iconic 7 Layer Dip
The trick to a truly stunning 7 Layer Dip is neatness! Take your time with each layer. I like to use the back of a spoon or a small offset spatula to gently spread each component right to the edges of the dish. This makes sure every scoop gets a bit of everything, and it looks so pretty when you bring it out. Don’t press down too hard, just a light, even spread!
Tips for a Stellar 7 Layer Dip Experience
For the absolute best results, make sure you give your dip at least 30 minutes, or even a few hours, to chill in the fridge. This really lets those flavors get to know each other. When it’s serving time, grab your favorite sturdy tortilla chips – you’ll need them! And if you want to get fancy, a little extra sprinkle of fresh cilantro on top just before serving adds another layer of freshness. Enjoy!
Mastering Your 7 Layer Dip: Troubleshooting and Substitutions
Okay, so you’ve got the basics down, but what if you run into a little snag, or you’re just feeling adventurous and want to mix things up? Don’t worry, I’ve got you covered! This 7 Layer Dip is pretty forgiving, and there are tons of ways to make it work for you, whether you’re planning ahead or just want to customize it to your personal taste.
Common Questions About 7 Layer Dip
The number one question I get asked is, “Can I make this 7 Layer Dip ahead of time?” And the answer is a resounding YES! In fact, I often make it a few hours before a party, or even the night before. Just make sure to cover it tightly with plastic wrap to keep it fresh. As for how long it lasts, I’d say it’s best eaten within 2 days, especially with the fresh guacamole layer. After that, it might start looking a little less vibrant, though still tasty!
Customizing Your 7 Layer Dip
This recipe is super flexible! If you’re not a fan of black olives, no worries, just leave ’em out or swap them for some finely diced bell peppers. Want a little more spice? Use a hot salsa, or add a layer of sliced jalapeños (fresh or pickled!). You can also play with the cheese – a Mexican blend or Monterey Jack works wonderfully. Some people even add a layer of seasoned ground beef or shredded chicken if they want to make it heartier, though then it’s not vegetarian anymore!
Frequently Asked Questions About This 7 Layer Dip
Got more questions about this amazing 7 Layer Dip? I bet you do! It’s one of those recipes that brings up a lot of common queries, especially since it’s such a staple for gatherings. Here are some of the most asked questions I get, and my best tips for them!
Can I Prepare My 7 Layer Dip in Advance?
Absolutely, yes! It’s actually one of its superpowers. I often make my 7 Layer Dip a few hours before the party, or even the night before. Just make sure to cover it really well with plastic wrap, pressing it down onto the surface of the dip to keep air out. This helps keep everything fresh, especially that guacamole layer!
What Are the Best Dippers for 7 Layer Dip?
Oh, the dippers! My go-to is always sturdy tortilla chips – the scoopable kind are the best for getting all seven layers in one bite! But don’t stop there. You can also use corn chips, sliced bell peppers (red, yellow, green!), cucumber slices, or even carrot and celery sticks. Anything crunchy that can handle a good scoop works wonderfully with this easy 7 Layer Dip.
How to Store Leftover 7 Layer Dip
If by some miracle you have any leftover 7 Layer Dip (it’s rare, trust me!), you’ll want to store it properly. Transfer any remaining dip to an airtight container or cover the dish tightly with plastic wrap, again, pressing it right onto the surface. Pop it in the fridge, and it should stay good for about 1-2 days. After that, the guacamole might start to brown a bit, but it’ll still taste pretty good!
Estimated Nutritional Information for Your 7 Layer Dip
So, you’re curious about the nitty-gritty details, huh? I totally get it! While I’m not a nutritionist, I can give you an estimate of what you’re looking at with this amazing 7 Layer Dip. Just remember, these numbers are based on the ingredients and brands I typically use, so yours might vary a little bit. It’s a fantastic, flavorful snack for your party!
Share Your 7 Layer Dip Success
Alright, friends, now it’s YOUR turn! I’d absolutely love to hear all about your 7 Layer Dip adventures. Did your guests devour it? Did you add any fun twists? Please, pretty please, share your photos and stories in the comments below! And don’t forget to rate the recipe – it helps other home cooks find this party-perfect gem. Happy dipping!
Print
Glorious 7 Layer Dip: A Party Game-Changer
- Total Time: 50 minutes
- Yield: 12 servings 1x
- Diet: Vegetarian
Description
This 7 Layer Dip is a crowd-pleasing appetizer, perfect for parties and gatherings. It features layers of refried beans, guacamole, sour cream, salsa, cheese, black olives, and green onions.
Ingredients
- 1 (16 ounce) can refried beans
- 1 (1.25 ounce) package taco seasoning mix
- 1 (8 ounce) container sour cream
- 1 (15 ounce) can salsa
- 2 ripe avocados, mashed
- 1 tablespoon lime juice
- 1/2 teaspoon salt
- 1/4 teaspoon black pepper
- 2 cups shredded Cheddar cheese
- 1 (2.25 ounce) can sliced black olives, drained
- 1/2 cup chopped green onions
Instructions
- In a medium bowl, combine refried beans and taco seasoning mix. Spread evenly onto the bottom of a large serving platter or 9×13 inch dish.
- In another bowl, mash avocados with lime juice, salt, and pepper. Spread the guacamole over the bean layer.
- Spread sour cream evenly over the guacamole.
- Spoon salsa over the sour cream layer.
- Sprinkle shredded Cheddar cheese over the salsa.
- Arrange sliced black olives over the cheese.
- Sprinkle with chopped green onions.
- Chill for at least 30 minutes before serving.
Notes
- Serve with tortilla chips or your favorite dippers.
- For best results, prepare the dip a few hours before serving to allow flavors to meld.
- Leftovers can be stored in an airtight container in the refrigerator for up to 2 days.
- Prep Time: 20 minutes
- Cook Time: 0 minutes
- Category: Appetizer
- Method: No Cook
- Cuisine: Mexican
Nutrition
- Serving Size: 1/12 of recipe
- Calories: 300
- Sugar: 3g
- Sodium: 650mg
- Fat: 20g
- Saturated Fat: 9g
- Unsaturated Fat: 8g
- Trans Fat: 0g
- Carbohydrates: 18g
- Fiber: 6g
- Protein: 10g
- Cholesterol: 30mg
Keywords: 7 layer dip, party dip, Mexican dip, appetizer, refried beans, guacamole, sour cream, salsa, cheese, olives, green onions